Warning!! Long Post Ahead: Today marks the end of our third assignment in 3D Design. Finally managed to finish this epic Old Man Super Hero Wannabe sculpture. Attached is a documentary of the process.

This is the first process of Sculpture modeling for Sculpey. The armature is made up of 1/8 inch wire which makes a pretty strong foundation for Sculpey. Building of the armature is done with one single 1/8 inch armature wire.

More delicate features like fingers are normally made with the smaller 1/16 inch armature wire. An important thing to take note is that the wires need to be coiled tightly to prevent the sculpey from breaking up when it is bake at a later time.

Notice how the fingers get twine around the bigger amarture.

Front View of the basic armature made. The cape at the back is made out of mesh wire.

Side View.

Back View.

Because of the fact that the armature will eventually be mount onto a board, (This is because the model is in a dynamic running position is whole body suspended in mid-air less one leg and cane) it is always wise to leave enough armature wire for attachment rather than trying to epoxy when its done in this case.

A surgery is done at this point of time because without a skeleton for the foot, the sculpey might fall apart during baking or when the model is transported.

Close up of foot.

In order to make the movement more dynamic, the cape is enhanced with 1/8 inch armature wire to give strength and structural integrity.

Back View of the final armature. Aluminium foil is used to cover up any gaps that might have existed in the armature. It also helps to heat up the sculpey from within when it is bake in the oven.

The next step: Adding Sculpey.

Top view of the finish Sculpey foundation.

Texture is added to enhance the aesthetic look and design of the model.

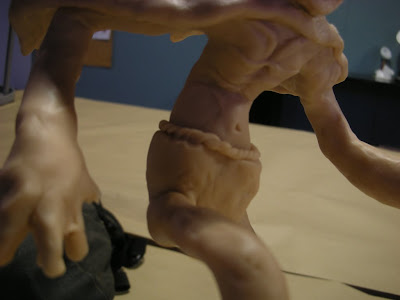
The facial feature is created by adding layers of Sculpey onto it. It gives us more control over the model.

Moving on to the body.

Close up of face feature.
Because the model is eventually going to be an old man, it is important to research the body build and reference of the actual figure to create that believability of the model.

Front Shot.

Texturing of Cape.

Close up of boots texture.

Side View of Boots.

Once the textured is sculpt into the sculpey, the model is ready to bake. For Super Sculpey, the baking time is 15 mins under 275 degree.

Front view of the bake Sculpey.

When the Sculpey turns brown, it is probably baked and ready. Notice the top part of the model is burnt and the foot still looks like its not done. Don't worry about the uneven in baking, because as mentioned earlier, the aluminium foil in the armature will continue to retain the heat and bake the Sculpey from within. Be sure to set the model aside for 15 mins to cool off.

In this project, Acrylic is used to paint over the Sculpey. The good thing about using Acrylic is the fact that when it is dried up, it holds on very well to the model.

Side view of foundation color.

The wooden cane is colored multiple times with different shades of brown to give the illusion of depth to the model.

Final Finished Model!!

Side View.


 This is the first process of Sculpture modeling for Sculpey. The armature is made up of 1/8 inch wire which makes a pretty strong foundation for Sculpey. Building of the armature is done with one single 1/8 inch armature wire.
 More delicate features like fingers are normally made with the smaller 1/16 inch armature wire. An important thing to take note is that the wires need to be coiled tightly to prevent the sculpey from breaking up when it is bake at a later time.
 Notice how the fingers get twine around the bigger amarture.
 Front View of the basic armature made. The cape at the back is made out of mesh wire.
 Side View.
 Back View.
 Because of the fact that the armature will eventually be mount onto a board, (This is because the model is in a dynamic running position is whole body suspended in mid-air less one leg and cane) it is always wise to leave enough armature wire for attachment rather than trying to epoxy when its done in this case.
 A surgery is done at this point of time because without a skeleton for the foot, the sculpey might fall apart during baking or when the model is transported.
 Close up of foot.
 In order to make the movement more dynamic, the cape is enhanced with 1/8 inch armature wire to give strength and structural integrity.
 Back View of the final armature. Aluminium foil is used to cover up any gaps that might have existed in the armature. It also helps to heat up the sculpey from within when it is bake in the oven.
 The next step: Adding Sculpey.
 Top view of the finish Sculpey foundation.
 Texture is added to enhance the aesthetic look and design of the model.
 Moving on to the body.
 Close up of face feature.
 Because the model is eventually going to be an old man, it is important to research the body build and reference of the actual figure to create that believability of the model.
 Front Shot.
 Texturing of Cape.
 Side View of Boots.
 Once the textured is sculpt into the sculpey, the model is ready to bake. For Super Sculpey, the baking time is 15 mins under 275 degree.
  Front view of the bake Sculpey.
 When the Sculpey turns brown, it is probably baked and ready. Notice the top part of the model is burnt and the foot still looks like its not done. Don't worry about the uneven in baking, because as mentioned earlier, the aluminium foil in the armature will continue to retain the heat and bake the Sculpey from within. Be sure to set the model aside for 15 mins to cool off.
 Side view of foundation color.
 The wooden cane is colored multiple times with different shades of brown to give the illusion of depth to the model.
 Final Finished Model!!
 Side View.
No comments:
Post a Comment